How to generate and insert LaTeX tables in Overleaf
About this article
This article explains how to generate, edit, and insert LaTeX tables using Visual Editor, which is one way to generate LaTeX tables in Overleaf. In practice, there are four options to create tables:
- Using the Insert Table button in the Visual Editor (or Code Editor) toolbar.
- Copying and pasting a table from another document while using Visual Editor.
- Writing the LaTeX code for the table in Code Editor.
- Using Writefull for Overleaf’s LaTeX table generator.
If you’re a confident LaTeX user you'll likely use option 3, which offers the most flexibility for generating tables. If you’re new to LaTeX, using the toolbar in Visual Editor (option 1) is a great way to get started and is the focus of this article—you can switch between Visual Editor and Code Editor to see the code behind the table. As you gain experience, take a look at our detailed guidance on how to create tables using LaTeX.
Contents
Here are the main topics covered in this article.
- Using Insert Table to create a table in your project
- How to edit or customize an inserted table
- How to edit table cells
- How to select one or more columns or rows
- How to change the table caption
- How to add borders to table cells
- How to change the table’s label
- How to change the alignment of a table column
- How to set the width of table columns
- How to change the alignment of a table cell
- How to merge (or unmerge) table cells
- How to delete a table row or column
- How to add new rows or columns
- FAQs about tables in Visual Editor
Using Insert Table to generate a table for your Overleaf project
Please note: this feature is new and more functionality is planned, so keep checking back to this page to see what else is added. We’d also love your feedback on it, which you can provide in this survey.
- Switch to Visual Editor using the toggle above the editor pane (or remain in Code Editor if you are comfortable editing LaTeX code).
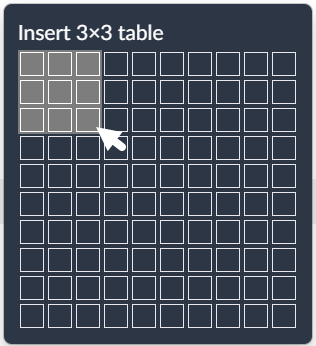
- Select the Insert table button (
 ) on the toolbar.
 - Using the pop-up selector, highlight the required number of rows and columns, then click the bottom-right selected cell to insert an empty table. Here, we insert a blank 3 x 3 table:
- The empty table is now ready for you to edit. You can do this in Code Editor if you’re comfortable with LaTeX table code, or continue with Visual Editor, which provides additional table formatting functionality that’s currently unavailable in Code Editor.

This short video clip shows a 3 × 3 table being added to a project.
How to edit or customize an inserted table
In Visual Editor, select one or more of your table’s cells to display the table editor menu.

Some menu icons remain grayed out (inactive) until you select a suitable range of cells required to complete those actions. For example, you can only merge cells after you’ve selected two or more cells in a row.
Here’s a short summary of the icons and drop-down menus.
 Delete or move the table caption.
 Change the table borders.
 Set the alignment of a column or merged cell.
 Adjust column width.
 Merge cells in a row.
 Delete rows or columns.
 Insert rows and columns.
  Delete the entire table. To restore an accidentally deleted table, use the Undo button (
 ) on the toolbar located above the Visual Editor and Code Editor.
 Get help.
 Send feedback to Overleaf.

How to edit table cells
There are two ways to start editing a cell:
- Double-click on the cell you want to edit.
- Use the tab or arrow keys to navigate to a particular cell, then press Enter.
Here are some tips for editing cell content using Visual Editor:
- Use LaTeX commands, not the toolbar, to apply bold or italic styles to cell text:
- use
\textbf{...}for bold text. - use
\textit{...}for italic text. - use
\textbf{... \textit{...}...}for text in bold italic.
- Cells can contain inline mathematics via
\( ... \).
Visual Editor will preview the styled text and inline math.
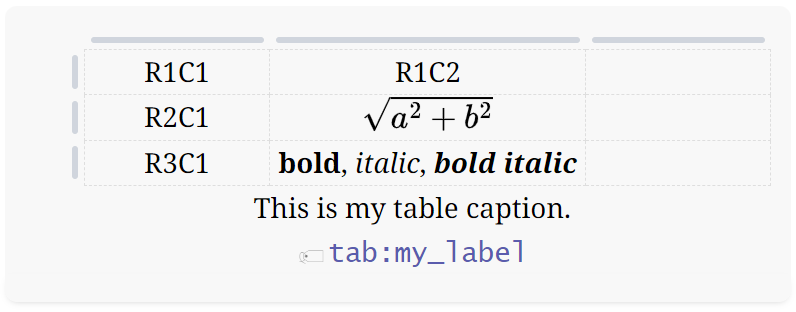
Example: styled text and math in table cells
The next screenshot shows Visual Editor previewing the following cell content
\(\sqrt{a^2+b^2}\)\textbf{bold}, \textit{italic}, \textbf{\textit{bold italic}}
How to select one or more columns or rows
- Use the row or column selectors to select a particular row or column.
- Hold down the Shift key to select multiple rows or columns.
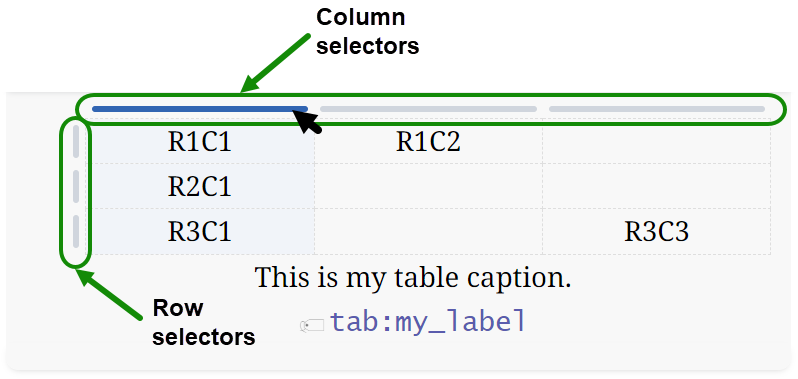
You can also select multiple rows or columns by clicking on (selecting) a cell and dragging the selection (mouse) pointer.
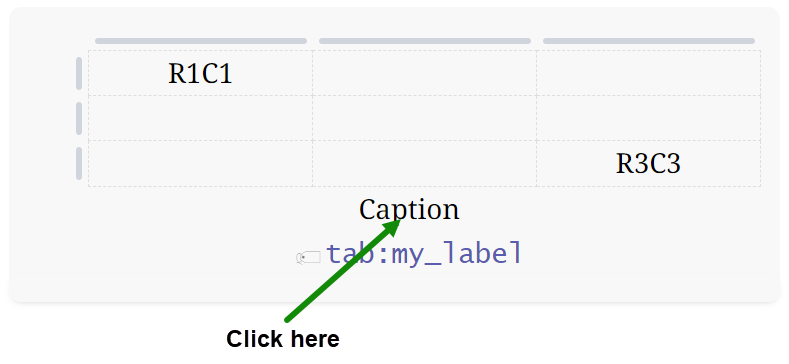
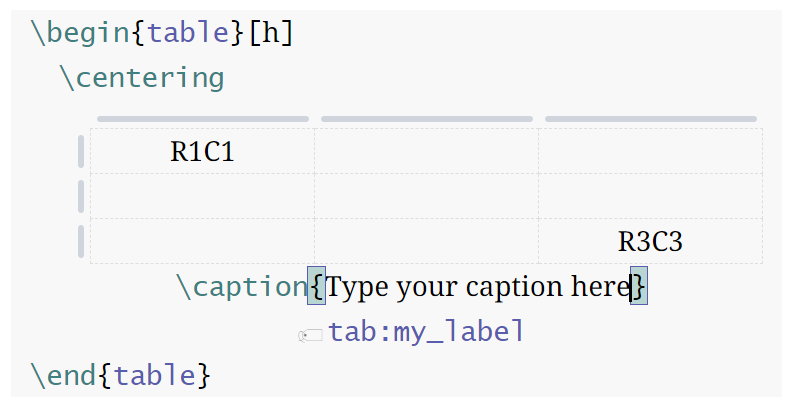
How to change the table caption
To edit the caption text
- Click on the default caption text, which is the word Caption.
- The LaTeX
\captioncommand is displayed. - Add your preferred caption between the braces
{...}
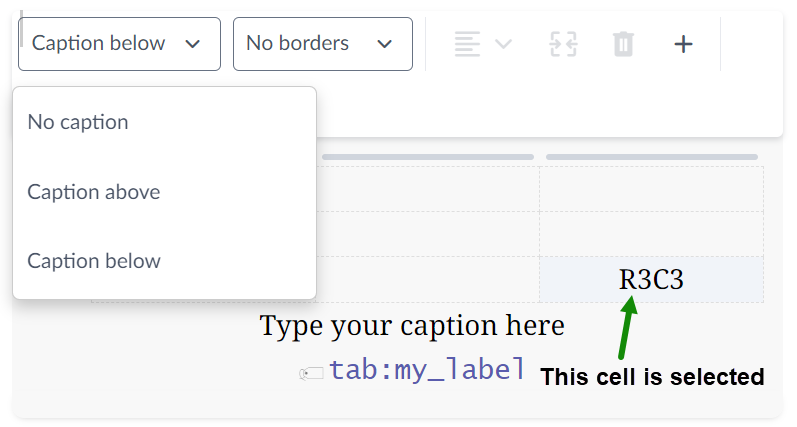
To remove the caption or place it above or below the table
- Select any table cell to display the table editor menu.
- From the caption drop-down menu, select your preferred option:
- No caption: Remove it.
- Caption above: Place the caption above the table.
- Caption below: Place the caption below the table.
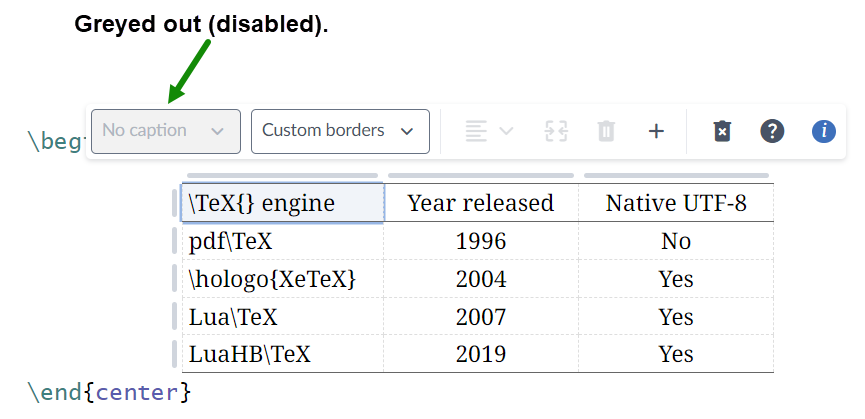
- Note: The caption dropdown is disabled if the
tabularenvironment is not directly inside atableenvironment. This is demonstrated by the following example in which thetabularenvironment is directly inside acenterenvironment.
\documentclass{article}
\usepackage{hologo} % for the XeTeX logo
\begin{document}
\begin{center}
\begin{tabular}{lcc}
\hline
    \TeX{} engine&Year released&Native UTF-8\\
\hline
    pdf\TeX&1996&No\\
    \hologo{XeTeX}&2004&Yes\\
    Lua\TeX&2007&Yes\\
    LuaHB\TeX&2019&Yes\\
\hline
\end{tabular}
\end{center}
\end{document}
If you open the code above in Overleaf then switch to Visual Editor you’ll see the caption dropdown is greyed out (disabled):
How to add borders to table cells
At the moment, Visual Editor provides basic support for borders, accessible from the borders drop-down menu which currently has two user-selectable options:
- All borders: All cells have a border.
- No borders: No cells have a border.
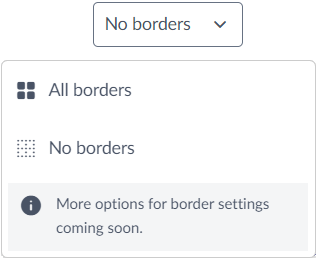
A table inserted from the toolbar starts with the No borders option. If you add borders using LaTeX code the button will display Custom borders.
How to change the table’s label
- Click on the default label text
tab:my_label. - The LaTeX
\labelcommand is displayed. - Add your preferred label between the braces {...}.
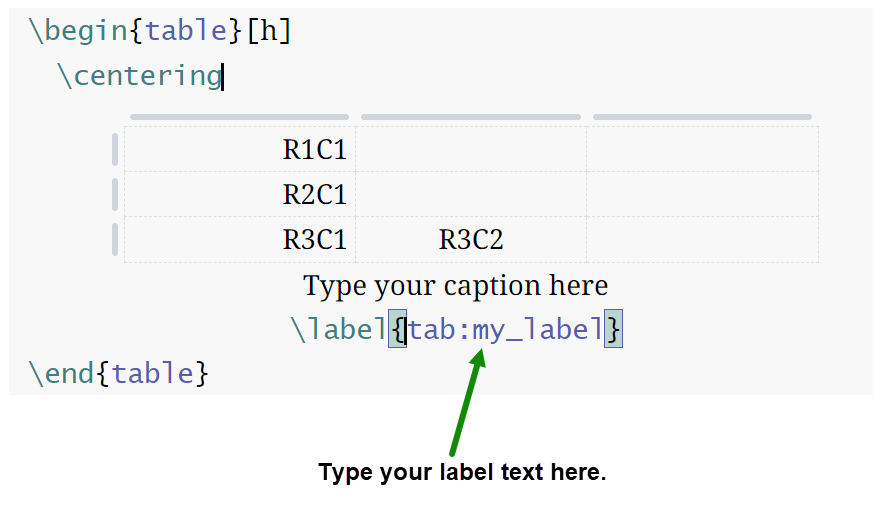
The label text is an identifier used to reference this table elsewhere in your document. You can read more about using labels in our article on cross-referencing.
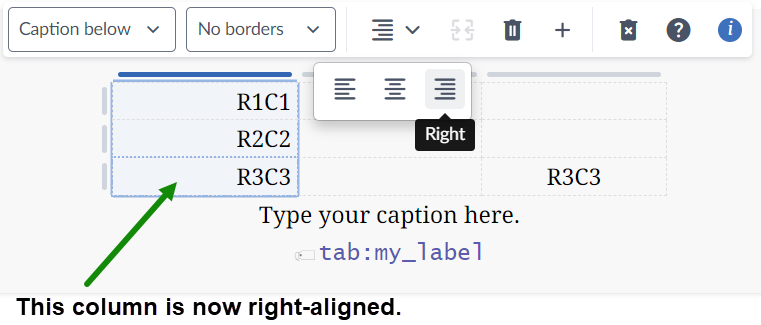
How to change the alignment of a table column
Table columns can be right-, left-, or center-aligned. Follow these steps to change a column’s alignment:
- Select the column(s) whose alignment you want to change.
- The alignment icon () becomes active.
- Select the drop-down menu then choose the preferred alignment: left, centered, or right.
- The following screenshot shows how to right-align all cells in column 1 of a table:
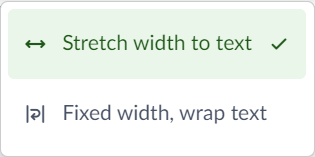
How to set the width of table columns
Changes made to table column width settings will affect the typeset table only, not the preview provided by Visual Editor. You need to recompile your document to see the result of any changes made to column widths.
Follow these steps to set column width(s) to a fixed value, or allow the width(s) to vary according to the content in the column cells.
- Select the column(s) whose width you want to change. The column width icon () is then enabled.
- Select the drop-down menu:
- Choose the preferred option for the selected column(s):
- Stretch width to text: this option allows the typeset column width(s) to be determined by the amount of content contained in the column's cells; e.g., the width of typeset text or mathematics.
- Fixed width, wrap text: sets the width of the column(s) to a fixed value which causes line breaking (text wrapping) within column cells. Selecting this option displays the Set column width window used to set fixed column width(s), as explained in the next section.
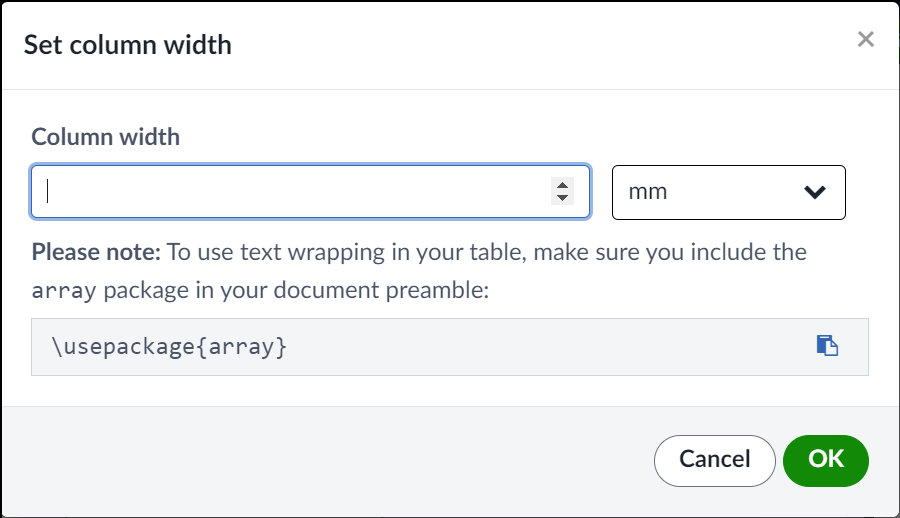
How to set a fixed column width
The Set column width pop-up window provides a drop-down list containing three ways to set fixed columns-widths:
- As a percentage (%) of the current environment's line width: the table column widths might then vary according to where the table is used (see example below).
- Using explicit widths expressed in units of millimeters (mm), centimeters (cm), inches (in) or points (pt).
- A Custom option using LaTeX commands to calculate the width (see example below).
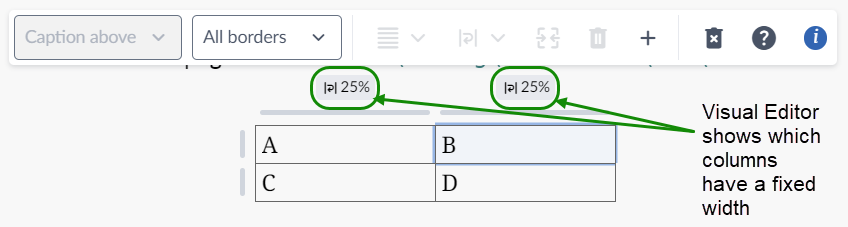
The following image shows how Visual Editor uses a small icon to indicate columns with a fixed width. You can edit the fixed-width setting by selecting (clicking) the icon to display the Set column width window.
Example: using percentage of line width
The LaTeX command \linewidth holds the value of the current line width, which varies based on the document format, such as single-column or double-column layouts. Additionally, the value of \linewidth can change in specific environments, e.g., within a minipage.
This example uses the multicol package to typeset two identical tables with column widths set to 0.25\linewidth. One table is typeset in a single-column section, the other in a two-column section, demonstrating how changes to \linewidth affects the table column widths.
\documentclass{article}
\usepackage{array}
\usepackage{multicol}
\begin{document}
\section{Section with a single column}
This part of the page is a single column with \verb|\linewidth|=\the\linewidth.\vskip12pt

\begin{tabular}{|p{0.25\linewidth}|p{0.25\linewidth}|}
\hline
A & B\\
\hline
C & D \\
\hline
\end{tabular}

\vskip12pt \noindent We now typeset the same table in a two-column section.
\begin{multicols}{2}
[
\section{Section with two columns}
]
Here, \verb|\linewidth|=\the\linewidth. The table column widths are smaller.

\begin{tabular}{|p{0.25\linewidth}|p{0.25\linewidth}|}
\hline
A & B\\
\hline
C & D \\
\hline
\end{tabular}
\end{multicols}
\end{document}
Open this example in Overleaf and switch to Visual Editor.
This example produces the following output:

Example: using custom commands
The Custom option lets you set column widths using a wider range of units including em, ex and sp together with LaTeX commands—provided those commands produce a valid width value in units LaTeX understands.
The next example demonstrates just a few of the many ways you can use the Custom option to set column widths, including use of the units em and ex, simple arithmetic expressions and more advanced calculations using LaTeX commands. The\dimexpr ("dimension expression") command is used to perform arithmetic operations on LaTeX lengths (also called dimensions) using addition, subtraction, multiplication, or division. In essence, \dimexpr enables use of dynamically-calculated lengths, including the width of table columns.
\documentclass{article}
\usepackage{array}
\begin{document}
\newdimen\mydim
\mydim=1.25cm
\newcommand{\Acol}{\dimexpr 1cm + 0.1in + 3pt + 2.5mm\relax}
\newcommand{\Bcol}{0.1\linewidth}

\begin{itemize}
    \item Width of column 1: 4em=\the\dimexpr 4em\relax
    \item Width of column 2: 3ex=\the\dimexpr 3ex\relax
    \item Width of column 3: \verb|\Acol| sets a width of \the\dimexpr 1cm + 0.1in + 3pt + 2.5mm\relax
    \item Width of column 4: \verb|\Bcol| sets a width of \the\dimexpr0.1\linewidth\relax
    \item Width of column 5: \verb|\dimexpr0.25\linewidth+2cm-\mydim\relax| sets a width of \the\dimexpr0.2\linewidth+2cm-\mydim\relax
\end{itemize}

\begin{table}
\centering
\caption{Using \LaTeX{} commands and units to set column widths}
\begin{tabular}{|p{4em}|p{3ex}|p{\Acol}|p{\Bcol}|p{\dimexpr0.2\linewidth+2cm-\mydim\relax}|}
\hline
A & B &C & D&E\\
\hline
F& G&H& I&J\\
\hline
\end{tabular}
\end{table}
\end{document}
Open this example in Overleaf and switch to Visual Editor.
This example produces the following output:

How to change the alignment of a table cell
- The alignment of individual, non-merged, cells can’t be changed in Visual Editor.
- The content of merged cells can be aligned (see the section Merging two or more cells in a table row).
How to merge (or unmerge) table cells
Table cells can be merged, horizontally, within a table row, but not vertically within a table column.
Merging two or more cells in a table row
- Select the cells you want to merge.
- Select the Merge cells icon () to merge the cells.
- Optionally, you can change the alignment of the merged cells.
Unmerging two or more merged cells
- Select the merged cell.
- Select the Merge cells icon () to unmerge the cells.
The following video demonstrates merging three cells in a table row, changing alignment of the merged cell and unmerging the cell content.
- Note: All content contained in the merged cell is placed in the first cell of the unmerged set.
How to delete a table row or column
- Select the rows or columns you want to delete.
- Select the Delete row or column icon () to delete the selected rows or columns.
How to add new rows or columns
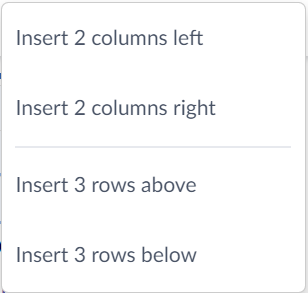
The Insert button () lets you add one or more new rows or columns before or after a selected location.
If you want to insert m rows and n columns, select an m × n group of cells covering the locations where you want to insert those rows and columns.
Example: In the following screenshot, a 3 × 2 group of cells straddling 3 rows and 2 columns has been selected.
- Selecting provides the following options:
- You can now insert any of the following:
- 2 columns to the left of column 1
- 2 columns to the right of column 2
- 3 rows above row 1
- 3 rows below row 3

FAQs about tables in Visual Editor
What if I want more formatting options?
There are many ways to configure tables that aren’t yet possible using Visual Editor generated tables. For more complex formatting you’ll need to use LaTeX code. Read our detailed guidance on how to create tables using LaTeX.
Can the Visual Editor preview tables I create using the Code Editor?
It depends on the table and its code, but the Visual Editor will try to preview as much as possible. Complex tables, such as those created using LaTeX packages, journal article templates, or custom user commands (macros), may be partially, or entirely displayed as LaTeX code when viewed in the Visual Editor.
If the table cannot be previewed, e.g., it contains LaTeX markup errors, you will see the following message:

Does Visual Editor support the booktabs package?
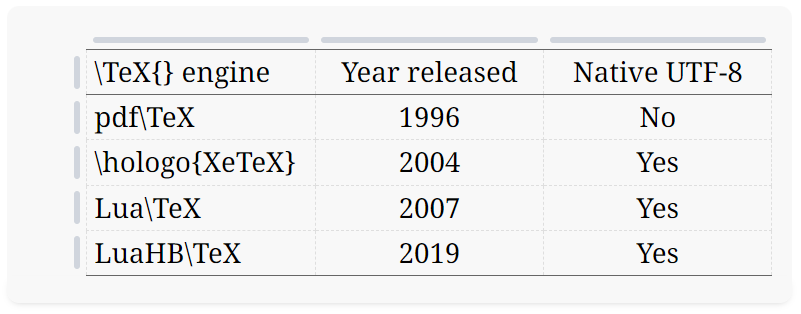
Visual Editor has some support for horizontal rules provided by the booktabs package. The following example uses the booktabs package commands \toprule, \midrule, and \bottomrule.
\documentclass{article}
\usepackage{booktabs}
\usepackage{hologo} % for the XeTeX logo
\begin{document}
\begin{table}
\begin{tabular}{lcc}
\toprule
    \TeX{} engine&Year released&Native UTF-8\\
\midrule
    pdf\TeX&1996&No\\
    \hologo{XeTeX}&2004&Yes\\
    Lua\TeX&2007&Yes\\
    LuaHB\TeX&2019&Yes\\
\bottomrule
\end{tabular}
\end{table}
\end{document}
Open this example in Overleaf and switch to Visual Editor.
Open the code above, then switch to Visual Editor to see the following preview:
Does Visual Editor preview borders applied using LaTeX code?
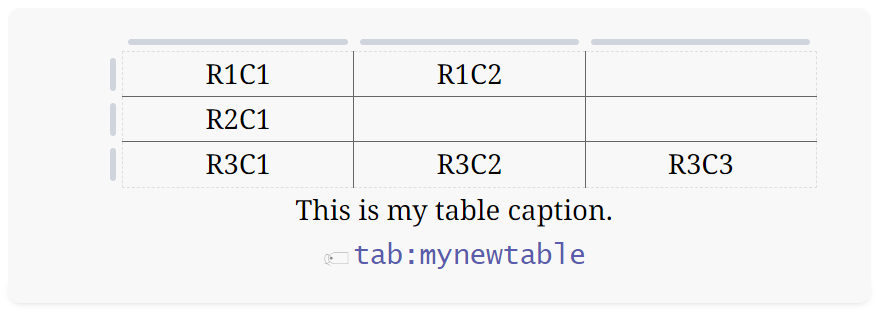
Borders created within the tabular environment using | in the table’s specification, or \hline in the table body will be previewed in Visual Editor, as demonstrated by the next example.
\documentclass{article}
\begin{document}
\begin{table}
\centering
\begin{tabular}{c|c|c}
         R1C1&R1C2& \\
         \hline
         R2C1&  & \\
         \hline
         R3C1 &R3C2 &R3C3\\
\end{tabular}
    \caption{This is my table caption.}
    \label{tab:mynewtable}
\end{table}
\end{document}
Open this example in Overleaf and switch to Visual Editor.
Open the code above, then switch to Visual Editor to see the following preview: