How to Write a Thesis in LaTeX (Part 2): Page Layout
Part 1 | Part 2 | Part 3 | Part 4 | Part 5
Author: Josh Cassidy (August 2013)
This five-part series of articles uses a combination of video and textual descriptions to teach the basics of writing a thesis using LaTeX. These tutorials were first published on the original ShareLateX blog site during August 2013; consequently, today's editor interface (Overleaf) has changed considerably due to the development of ShareLaTeX and the subsequent merger of ShareLaTeX and Overleaf. However, much of the content is still relevant and teaches you some basic LaTeX—skills and expertise that will apply across all platforms.
In the previous tutorial we looked at setting up the basic structure for a thesis.
In this post we'll start customising the page layout using the geometry and fancyhdr packages. We'll continue working on the same project as last time and the first thing we will do is make the document two-sided so that we save paper by printing on both sides. To do this we add the keyword twoside into the document class command:
\documentclass[12pt,twoside]{report}
The geometry package
Next we'll load up the geometry package. To configure the page layout, we enter instructions into the square brackets of this command.
The first thing we will do is change the paper size. By default the paper size is set to US letter but we'll change this to a4paper.
Next we'll change the width of the text by entering the keyword width followed by an equals sign and a number in millimetres. We can also change the margin sizes at the top and bottom of the page:
\usepackage[a4paper,width=150mm,top=25mm,bottom=25mm]{geometry}
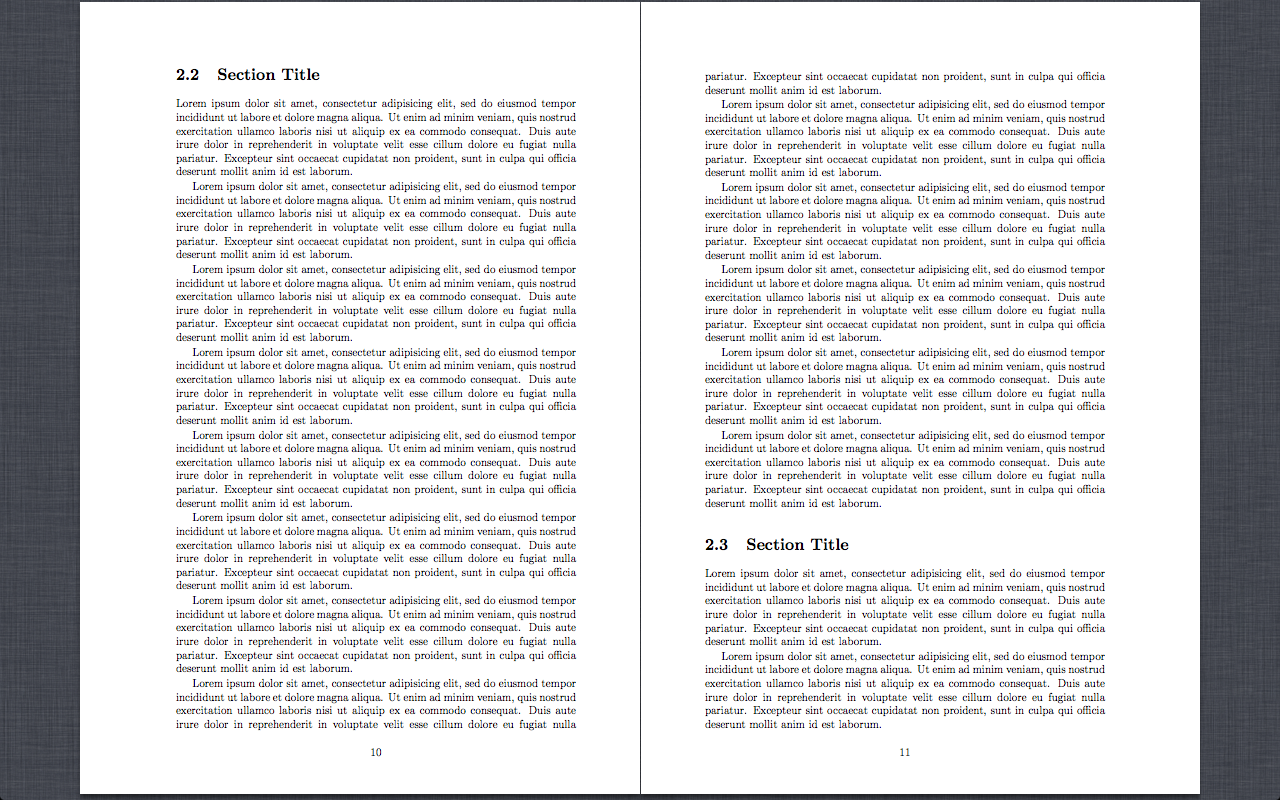
You will notice that on even pages the text is positioned slightly closer to the right-hand side and on odd pages it's closer to the left. Or in other words, the inner margin is smaller than the outer:
This is due to us specifying the twoside option but it often confuses people. The reason LaTeX does this is because when you bind the document together, the smaller inner margins will be adjacent and then combined will be a similar size to the larger outer margins. This mean that the three columns of white space you get with a double page spread will be a similar size:
However, you may also want to compensate for the actual binding. To do this we will use the bindingoffset command and we'll choose to offset it by 6mm:
\usepackage[a4paper,width=150mm,top=25mm,bottom=25mm,bindingoffset=6mm]{geometry}
You can see that the margins have now shifted:
The fancyhdr package
Next we'll add in headers and footers using the fancyhdr package. First let's load up the package. Immediately after the \usepackage command we need to add the \pagestyle command and enter fancy into the curly brackets:
\usepackage{fancyhdr}
\pagestyle{fancy}
If we now compile the code you will see that a header has been added to all the pages except the title page, the contents page and the first page of each new chapter. By default, the headers all contain the chapter and section titles:

If you're happy with this layout you can leave it like this. However, I'm going to show you how you can customise it using two commands provided by the fancyhdr package: \fancyhead and \fancyfoot. The standard format for these commands is the command followed by square brackets and then curly brackets:
\fancyhead[<position specifiers>]{<text>}
In the curly brackets we enter the text we want and in the square brackets we specify which parts of the header we want that text printed in. The fancyhdr package lets us add things in the left (L), right (R) and centre (C) of the header or footer and also lets us specify a different arrangement depending on whether its on an odd (O) or even (E) page. Here's an example of how we might customise our headers and footers:
\fancyhead{}
\fancyhead[RO,LE]{Thesis Title}
\fancyfoot{}
\fancyfoot[LE,RO]{\thepage}
\fancyfoot[LO,CE]{Chapter \thechapter}
\fancyfoot[CO,RE]{Author Name}
Here's the meaning of the various commands used in the above LaTeX fragment:
- In the first line we've entered a blank
\fancyheadcommand which clears all the header fields. - In the second line we've told LaTeX that we want the text "Thesis title" on the right-hand side of the header for the odd pages and the left for even pages.
- The third line clears the footer fields using a blank
\fancyfootcommand. - The fourth line makes the page number appear on the left of the footer for an even page and the right for an odd. The
\thepagecommand returns the page number of the page it's used on. - The
\thechaptercommand in line five is similar to\thepagebut, of course, typeset the chapter number. - Lines five and six add some text about the chapter and author into the footer again in different places depending on whether the page is odd or even.
Now if we compile the document with this code in we can see the headers and footers have been added in:
Header:

Footer:

Before moving on I should briefly introduce you to two more commands that you may find helpful when customising your headers and footers.
The \leftmark and \rightmark commands. Here's an example of what the \leftmark command produces:

And an example of what the \rightmark command produces:

To change the thickness of the lines in the headers and footers we use this code entering a size in points:
\renewcommand{\headrulewidth}{0.4pt}
\renewcommand{\footrulewidth}{0.4pt}
I recommend you keep it fairly small to keep it looking sensible.
Finally I want to mention the \pagestyle command. If we have a page that we want completely clear of headers and footers, we can use this command entering the the keyword empty in as an argument; for example:
\pagestyle{empty}
If we want a page with no headers or footers except for a simple page number at the bottom we would use the keyword plain. However you need to be aware that using this command changes the page style for all the pages following the command. Therefore we need to turn the page style back to fancy as soon as we want the headers back.
This concludes our discussion on page layout. In the next post we'll look at using images and tables.
All articles in this series
Overleaf guides
- Creating a document in Overleaf
- Uploading a project
- Copying a project
- Creating a project from a template
- Using the Overleaf project menu
- Including images in Overleaf
- Exporting your work from Overleaf
- Working offline in Overleaf
- Using Track Changes in Overleaf
- Using bibliographies in Overleaf
- Sharing your work with others
- Using the History feature
- Debugging Compilation timeout errors
- How-to guides
- Guide to Overleaf’s premium features
LaTeX Basics
- Creating your first LaTeX document
- Choosing a LaTeX Compiler
- Paragraphs and new lines
- Bold, italics and underlining
- Lists
- Errors
Mathematics
- Mathematical expressions
- Subscripts and superscripts
- Brackets and Parentheses
- Matrices
- Fractions and Binomials
- Aligning equations
- Operators
- Spacing in math mode
- Integrals, sums and limits
- Display style in math mode
- List of Greek letters and math symbols
- Mathematical fonts
- Using the Symbol Palette in Overleaf
Figures and tables
- Inserting Images
- Tables
- Positioning Images and Tables
- Lists of Tables and Figures
- Drawing Diagrams Directly in LaTeX
- TikZ package
References and Citations
- Bibliography management with bibtex
- Bibliography management with natbib
- Bibliography management with biblatex
- Bibtex bibliography styles
- Natbib bibliography styles
- Natbib citation styles
- Biblatex bibliography styles
- Biblatex citation styles
Languages
- Multilingual typesetting on Overleaf using polyglossia and fontspec
- Multilingual typesetting on Overleaf using babel and fontspec
- International language support
- Quotations and quotation marks
- Arabic
- Chinese
- French
- German
- Greek
- Italian
- Japanese
- Korean
- Portuguese
- Russian
- Spanish
Document structure
- Sections and chapters
- Table of contents
- Cross referencing sections, equations and floats
- Indices
- Glossaries
- Nomenclatures
- Management in a large project
- Multi-file LaTeX projects
- Hyperlinks
Formatting
- Lengths in LaTeX
- Headers and footers
- Page numbering
- Paragraph formatting
- Line breaks and blank spaces
- Text alignment
- Page size and margins
- Single sided and double sided documents
- Multiple columns
- Counters
- Code listing
- Code Highlighting with minted
- Using colours in LaTeX
- Footnotes
- Margin notes
Fonts
Presentations
Commands
Field specific
- Theorems and proofs
- Chemistry formulae
- Feynman diagrams
- Molecular orbital diagrams
- Chess notation
- Knitting patterns
- CircuiTikz package
- Pgfplots package
- Typesetting exams in LaTeX
- Knitr
- Attribute Value Matrices
Class files
- Understanding packages and class files
- List of packages and class files
- Writing your own package
- Writing your own class