How to Write a Thesis in LaTeX (Part 1): Basic Structure
Part 1 | Part 2 | Part 3 | Part 4 | Part 5
Author: Josh Cassidy (August 2013)
This five-part series of articles uses a combination of video and textual descriptions to teach the basics of writing a thesis using LaTeX. These tutorials were first published on the original ShareLateX blog site during August 2013; consequently, today's editor interface (Overleaf) has changed considerably due to the development of ShareLaTeX and the subsequent merger of ShareLaTeX and Overleaf. However, much of the content is still relevant and teaches you some basic LaTeX—skills and expertise that will apply across all platforms.
Your thesis could be the longest and most complicated document you'll ever write, which is why it's such a good idea to use LaTeX instead of a common word processor. LaTeX makes tasks that are difficult and awkward in word processors, far simpler.
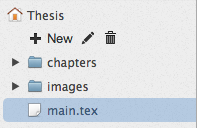
When writing something like a thesis its worth splitting up the document into multiple .tex files. It's also wise to organise the project using folders; therefore, we'll create two new folders, one for all the images used in the project and one for all the .tex files making up the main body of the thesis.
The preamble
In this example, the main.tex file is the root document and is the .tex file that will draw the whole document together.
The first thing we need to choose is a document class. The article class isn't designed for writing long documents (such as a thesis) so we'll choose the report class, but we could also choose the book class.
We can also change the font size by adding square brackets into the \documentclass command and specifying the size—we'll choose 12pt. Let's also prepare the document for images by loading the graphicx package. We'll also need to tell LaTeX where to look for the images using the \graphicspath command, as we're storing them in a separate folder.
The start of our preamble now looks like this:
\documentclass[12pt]{report}
\usepackage[utf8]{inputenc}
\usepackage{graphicx}
\graphicspath{ {images/} }
Now we can finish off the preamble by filling in the title, author and date information. To create the simplest title page we can add the thesis title, institution name and institution logo all into the \title command; for example:
\title{
{Thesis Title}\\
{\large Institution Name}\\
{\includegraphics{university.jpg}}
}
\author{Author Name}
\date{Day Month Year}
This isn't the best way to alter the title page so we'll look at more elaborate ways of customising title pages later on in the series, but this will suffice for now.
This is what the \maketitle command now produces for us:

The frontmatter
After the title page we need to add in an abstract, dedication, declaration and acknowledgements section. We can add each of these in on separate pages using unnumbered chapters. To do this we use the \chapter command and add an asterisk. After these sections we'll add a table of contents using the \tableofcontents command:
\chapter*{Abstract}
Abstract goes here

\chapter*{Dedication}
To mum and dad

\chapter*{Declaration}
I declare that..

\chapter*{Acknowledgements}
I want to thank...

\tableofcontents
The main body
Now for the main body of the document. In this example we will add-in five chapters, one of which will be an introduction and another will be a conclusion. However, instead of just composing these chapters in the main .tex file, we'll create a separate .tex file for each chapter in the chapters folder. We can then fill in these chapters with text remembering to split them up into sections and subsections.
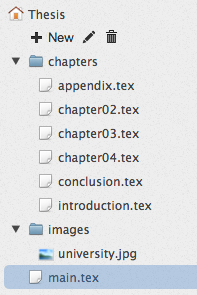
Then to add these chapters into the document, we use the \input command in the root document. Remember to add in chapters/ before the file name so that LaTeX knows where to find it.
\chapter{Introduction}
\input{chapters/introduction}

\chapter{Chapter Two Title}
\input{chapters/chapter02}

\chapter{Chapter Three Title}
\input{chapters/chapter03}

\chapter{Chapter Four Title}
\input{chapters/chapter04}

\chapter{Conclusion}
\input{chapters/conclusion}
The endmatter
We will now add in an appendix at the end of the document. To do this we use the \appendix command to tell LaTeX that what follows are appendices. Again We'll write the appendix in a separate file and then input it.
\appendix
\chapter{Appendix Title}
\input{chapters/appendix}
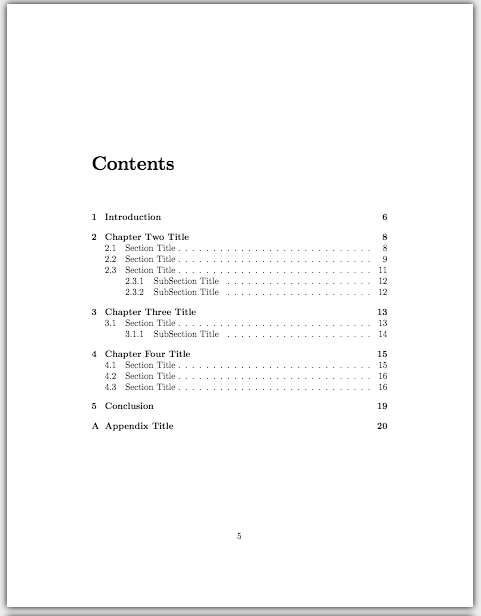
If we now compile the document, all our chapters will be added to the document and the table of contents will be automatically generated.

Now we have a basic structure for a thesis set up. In the next post I will show you how to change the page layout and add headers.
All articles in this series
Overleaf guides
- Creating a document in Overleaf
- Uploading a project
- Copying a project
- Creating a project from a template
- Using the Overleaf project menu
- Including images in Overleaf
- Exporting your work from Overleaf
- Working offline in Overleaf
- Using Track Changes in Overleaf
- Using bibliographies in Overleaf
- Sharing your work with others
- Using the History feature
- Debugging Compilation timeout errors
- How-to guides
- Guide to Overleaf’s premium features
LaTeX Basics
- Creating your first LaTeX document
- Choosing a LaTeX Compiler
- Paragraphs and new lines
- Bold, italics and underlining
- Lists
- Errors
Mathematics
- Mathematical expressions
- Subscripts and superscripts
- Brackets and Parentheses
- Matrices
- Fractions and Binomials
- Aligning equations
- Operators
- Spacing in math mode
- Integrals, sums and limits
- Display style in math mode
- List of Greek letters and math symbols
- Mathematical fonts
- Using the Symbol Palette in Overleaf
Figures and tables
- Inserting Images
- Tables
- Positioning Images and Tables
- Lists of Tables and Figures
- Drawing Diagrams Directly in LaTeX
- TikZ package
References and Citations
- Bibliography management with bibtex
- Bibliography management with natbib
- Bibliography management with biblatex
- Bibtex bibliography styles
- Natbib bibliography styles
- Natbib citation styles
- Biblatex bibliography styles
- Biblatex citation styles
Languages
- Multilingual typesetting on Overleaf using polyglossia and fontspec
- Multilingual typesetting on Overleaf using babel and fontspec
- International language support
- Quotations and quotation marks
- Arabic
- Chinese
- French
- German
- Greek
- Italian
- Japanese
- Korean
- Portuguese
- Russian
- Spanish
Document structure
- Sections and chapters
- Table of contents
- Cross referencing sections, equations and floats
- Indices
- Glossaries
- Nomenclatures
- Management in a large project
- Multi-file LaTeX projects
- Hyperlinks
Formatting
- Lengths in LaTeX
- Headers and footers
- Page numbering
- Paragraph formatting
- Line breaks and blank spaces
- Text alignment
- Page size and margins
- Single sided and double sided documents
- Multiple columns
- Counters
- Code listing
- Code Highlighting with minted
- Using colours in LaTeX
- Footnotes
- Margin notes
Fonts
Presentations
Commands
Field specific
- Theorems and proofs
- Chemistry formulae
- Feynman diagrams
- Molecular orbital diagrams
- Chess notation
- Knitting patterns
- CircuiTikz package
- Pgfplots package
- Typesetting exams in LaTeX
- Knitr
- Attribute Value Matrices
Class files
- Understanding packages and class files
- List of packages and class files
- Writing your own package
- Writing your own class